Value chart

For this artwork we painted a value chart, and shapes. To do this I started with the original color in the middle, and to the right I made the color darker, while to the left it was lighter. The shapes on the bottom have different values I did this by making is lighter where the light was hitting, and darker away from it.
Testing paints
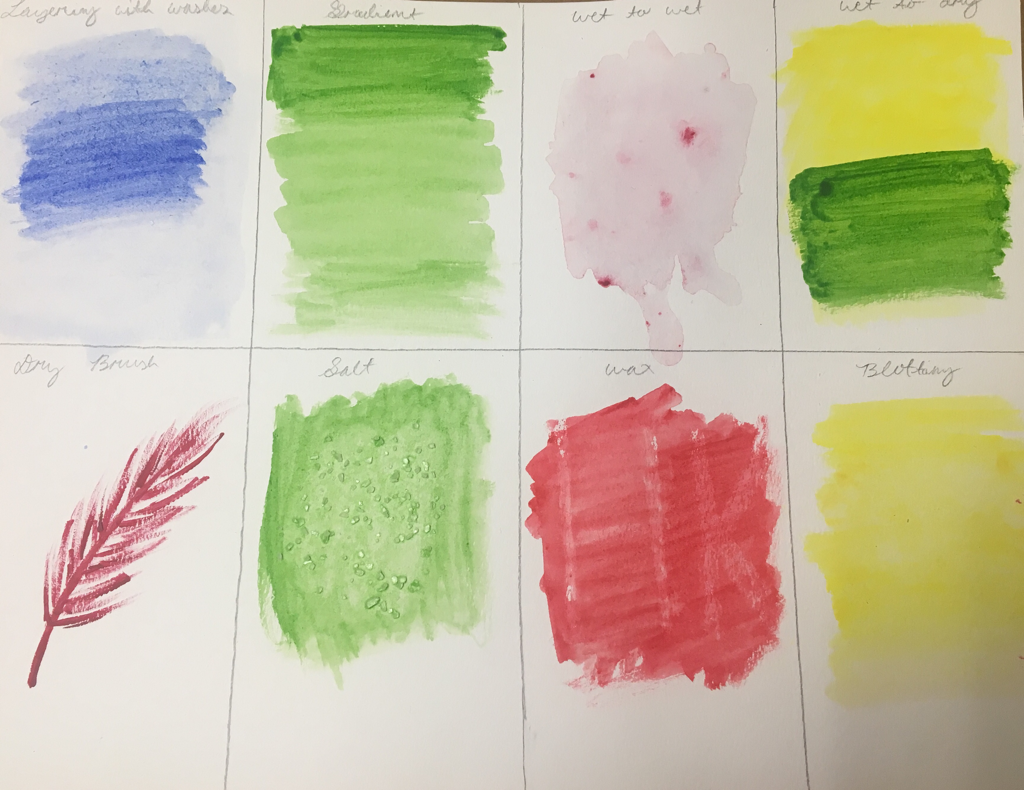
For this artwork we experimented with water color. I tried many things, like layering, using salt, and using a white crayon. Only using watercolor once before, it was interesting to paint these. The dry brush was the easiest to control, while wet to dry was the hardest.
Prisma color drawing
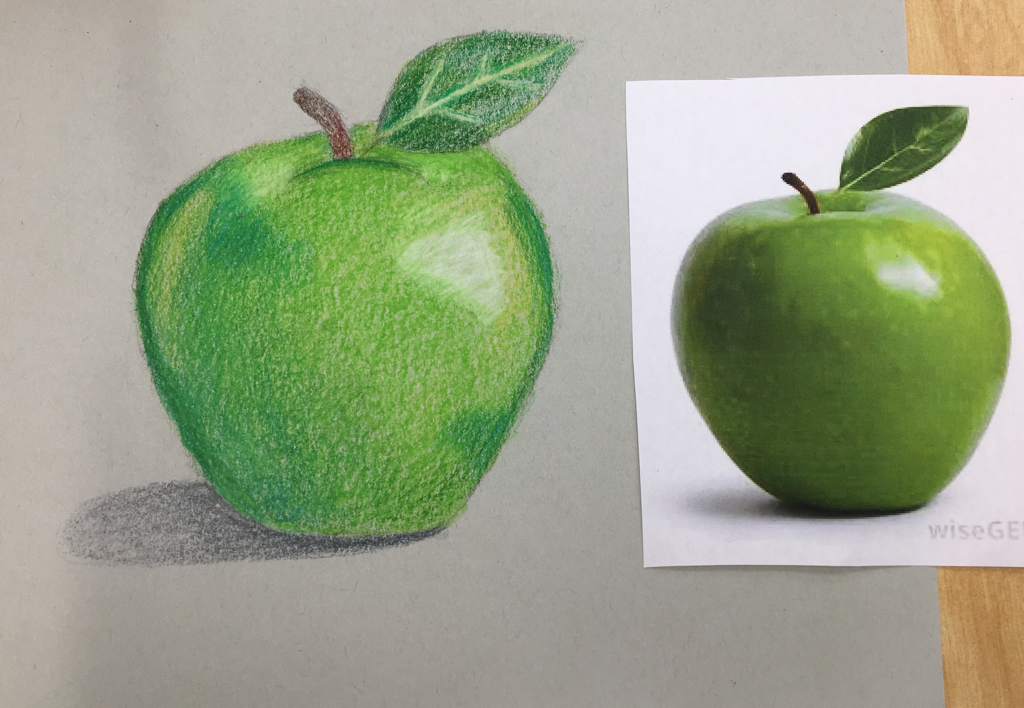
For this artwork we drew fruit as realistically as possible. I did this by layering prisma color multiple times and adding value. I also added some blue to make the darker parts pop out more. For the lighter green, I used some yellow to make it look more realistic.
PaiNting folder
For this artwork we were assigned four different things. We had to draw a street scene, an animal, a hand, and a tree. I drew these with the best of my ability, labeling each one. The hand was the hardest, while the animal was the easiest for me.
Apple paintings
For this assignment we had to paint apples with different color schemes. I chose monochromatic, warm colors, cool colors, and analogous. We had to paint an apple on a surface with each one having a shadow. The green paint was the hardest for me to use, while the red was the easiest. To go from darker to lighter, I added more water towards the lighter side.
Water color project sketch
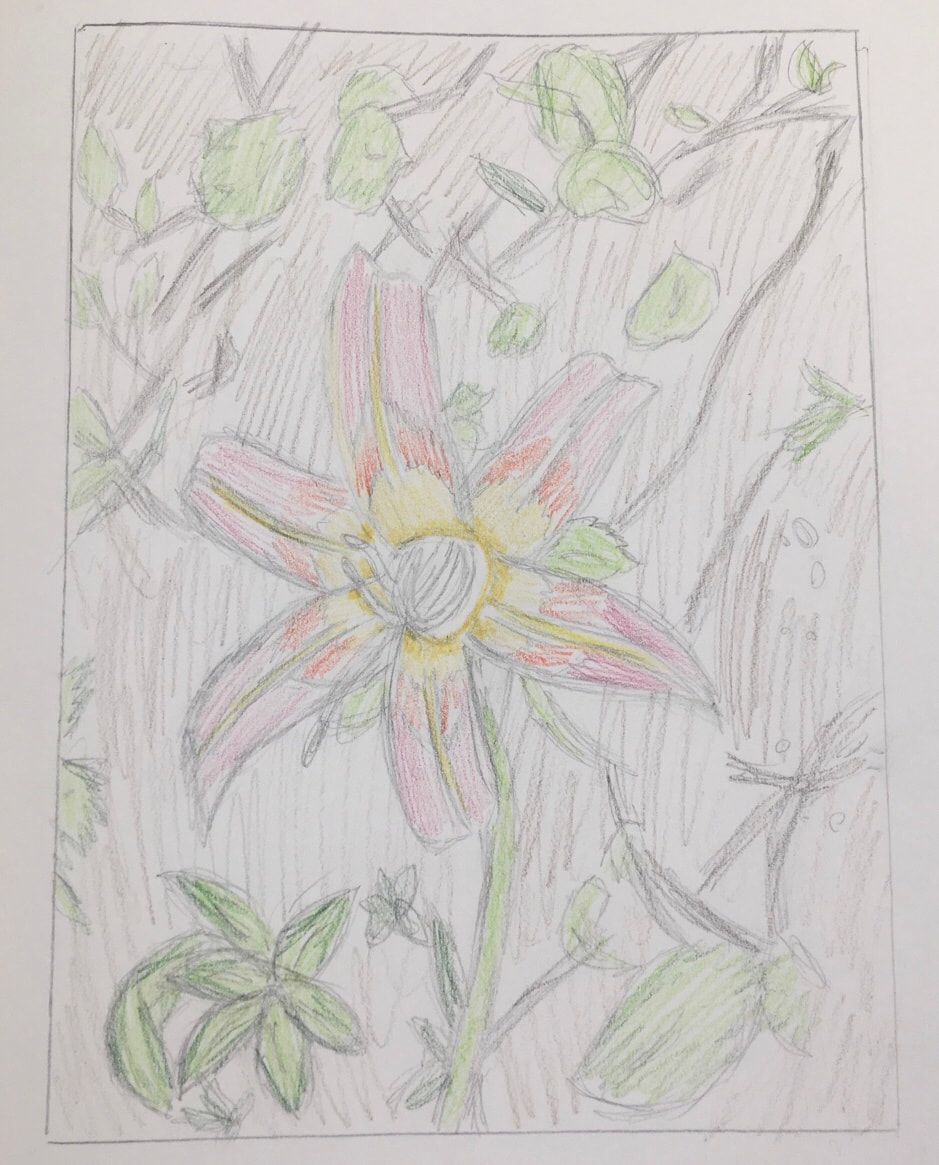
For this project I am painting a flower with a background. To start the process, I sketched the picture and added some color. This will give me an idea of what colors I want to use, and it helps me plan out spacing. I used light layers of colors to start out with. This also gives me a good idea on what I can improve on for the final painting.
Water color progress piCtures
These are some progress pictures of my water color painting. For the first picture, I started off on the background using a color made from purple and brown. The next picture I added some leaves in and used a light green to get the first layer in. For the last picture, I added some color to the flower. I used red, yellow, and a color mixed from orange and pink.
Water color final
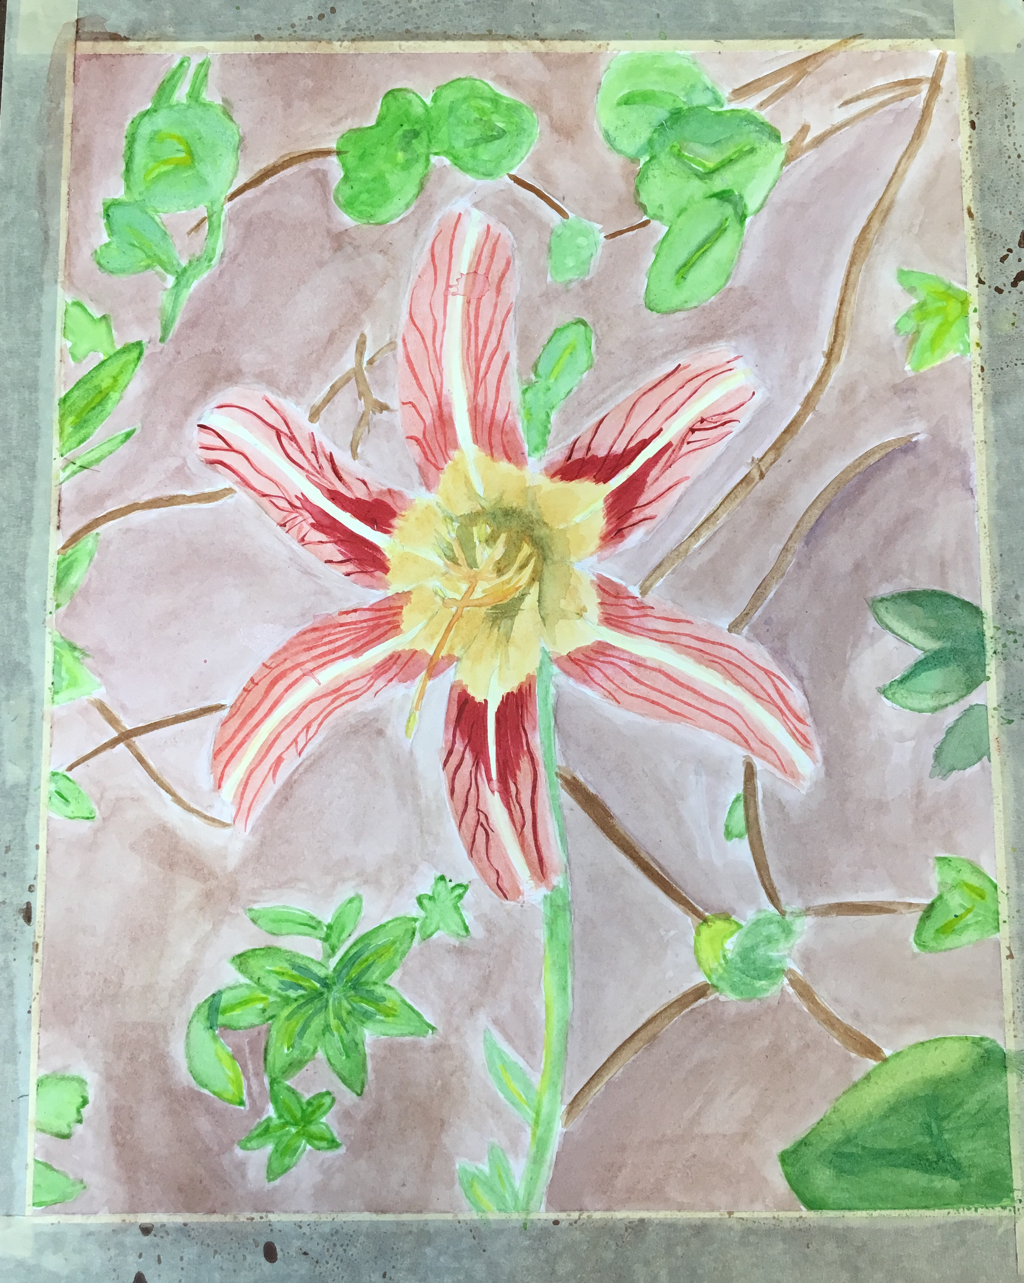
1. One water color technique that was effective in my painting was layering. I started with light layers which helped me add different colors if I needed to. One other technique that helped me was painting with water when I needed to get rid of brush strokes. The water helped smooth out the painting.
2. Using transparent layers was very important in my painting. This helped me get the exact color by layering. I could also paint over them if I needed to.
3. My composition was sort of successful. I showed shade and value by making some parts of the leaves lighter where the light was hitting it. I also gave the flower texture by adding veins to it. For the middle part of the flower, I made it darker because that’s where it goes inwards giving it dimension.
4. Color choice was an important factor in this painting. If I didn’t choose the right colors, the colors wouldn’t have looked like they blended on the flower. It’s also important because it makes certain parts of the painting pop out, like the flower.
5. For this painting, I painted a flower in a dirt background. The flower has red petals with visible veins on them, which I added by taking a thin red brush and painting them in. It also has a purple-brown background to make it look more like dirt. Then I added leaves around it, and some twigs too.
6. I would do many things differently to this project. I would change the background and add more purple to the brown to make it look more realistic. I would also make the leaves look a lot better by adding more yellows in them, and darker greens. I would probably add more of them in the painting too, so there is not as much brown showing.
7. I have learned a lot about water color from painting this. It’s improved my art skill too. I learned how to add value to a painting, how to blend colors, and how to smooth out brush strokes. These will help me in later paintings if I needed to use water color again.
Hundertwasser Sketches
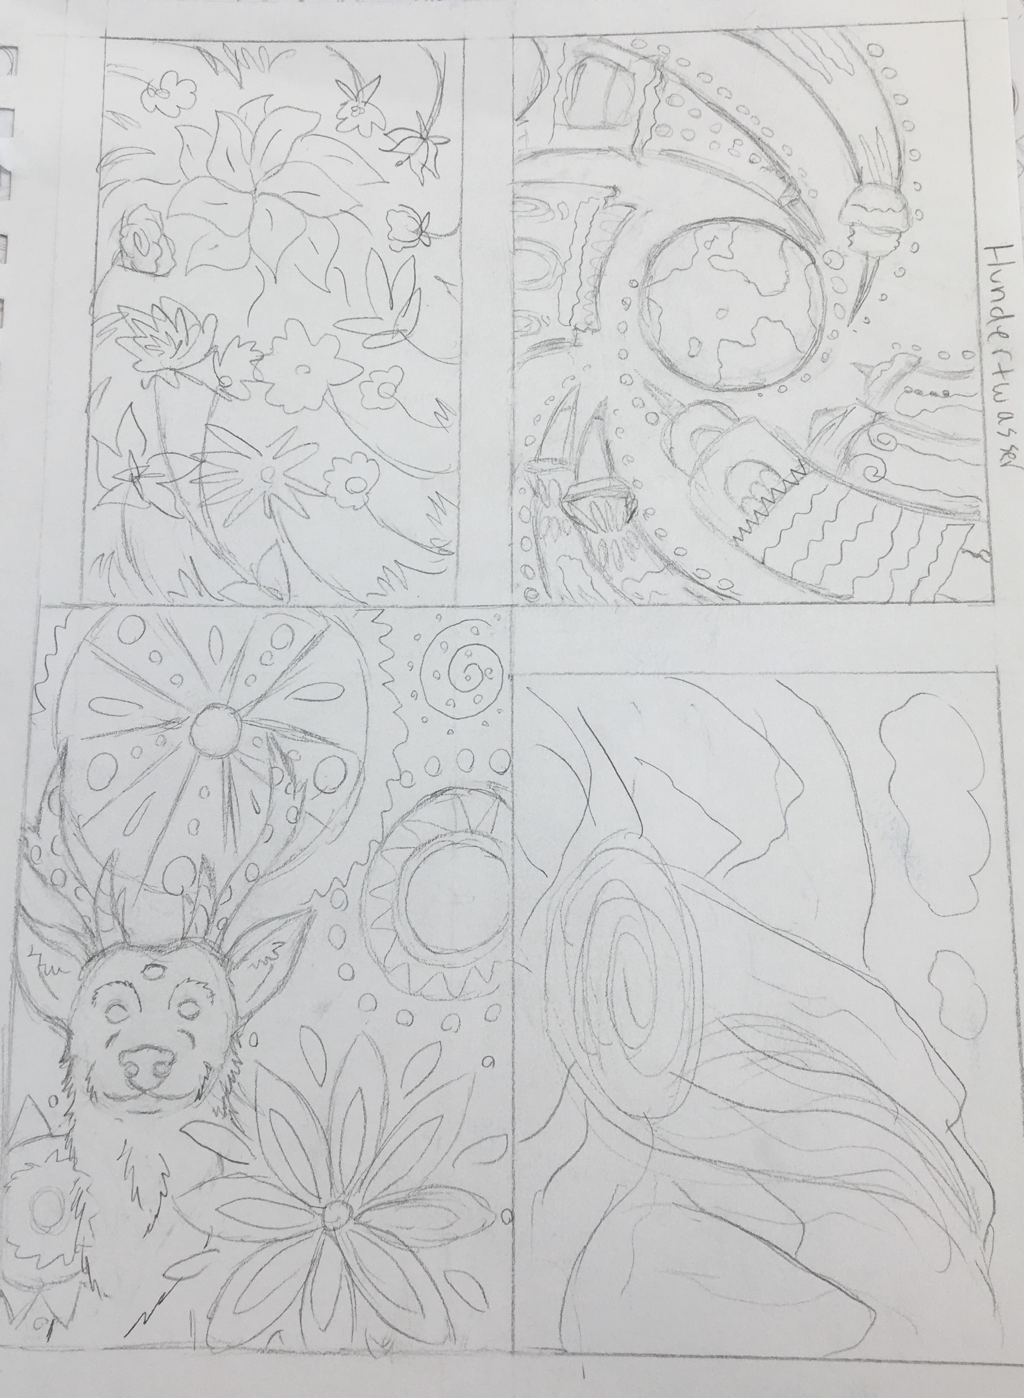
For this project, we are doing an acrylic painting based off of two artists styles. This includes a lot of spirals, multiple colors, and patterns. The deer and the city are my two favorites. I decided to go with the city because I don’t think that an animal would be right for this project.
HuNdertwasser In progress
These are my pictures of my in progress for my Hundertwasser painting. For my first picture, I painted the buildings and played around with the colors. For my next picture, I started to add some patterns into the building. This was hard for me because adding tiny details to a painting is usually a struggle. For my last picture, I decided to add some stars and dots. This is helping the picture come together. I also added more colors to the patterns on the buildings.
Hundertwasser Final
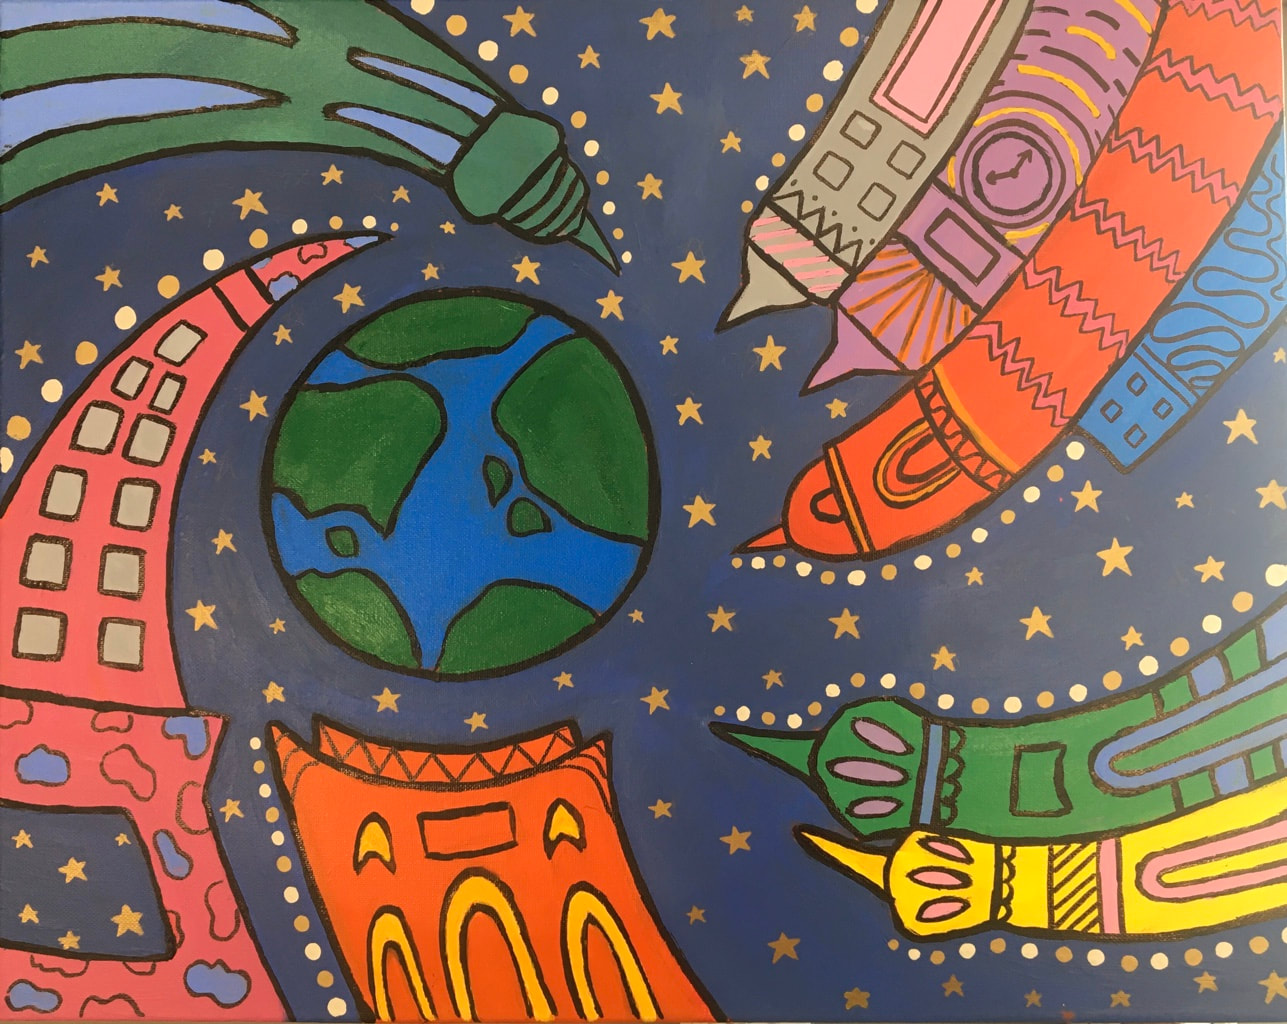
1.I think my painting is neat and well executed. All the colors are very different, but work well together. It could be a little neater by making the lines cleaner, but that’s it.
2. My work uses the artist style in many ways. I have one big “spiral”, and multiple patterns. There are also multiple colors.
3. I used very bright colors in this painting. I did this because I knew the sky would be dark, and I want the buildings to stand out. I used a mixture of cool and warm for the buildings, and they work well together.
4. The focal point of my work would be the Earth. The buildings are spiraling around it, and it’s sort of in the middle of my painting. Making the buildings surrounding it helps show that it’s the focal point.
5. I used multiple patterns for this artwork. It helps that every building has a pattern, so it all seems to work together. I chose random patterns for the buildings, I did this to seem more like the artist style.
6. I did not put a border on this painting. I think it could’ve looked good with it, but I don’t want it to draw attention away from the main part.
7. There were many difficulties painting this. I had trouble painting straight lines, and choosing colors. I also had trouble with getting the layers of paint on to be smooth.
Practice oIl paintings
These are my first two practice oil paintings. The first one, I used a bright orange for the first layer of the pumpkin, then added some purple for the darker spots. I then added green to the stem to make it look more realistic. For the shadow, I used a dark brown. The second painting I used a pallet knife. This was harder that using a paint brush, but it makes it easier for texture to appear. The first painting I used warm colors, whole the second painting I used cool colors.
Landscape sketches
These are two colored sketches I drew of landscapes. Since we were working with oil paint, I wanted to get a good idea of what colors to use and how I could blend them. For the one with the rock, I used multiple colors in the water including green and pink. For the other one I used a lot of green and yellow.
Landscape oil paint fInal
1. I would say my painting is neat and well executed. There aren’t any messy spots, and the lines are the way they are supposed to be. There are no blank spots on the painting.
2. I used very bright colors in this painting. I like to exaggerate the colors to make them pop out more. I mostly used a variety of blues and greens.
3. I created contrast by adding a lot of dark and bright colors. I used darks in the rock, and in the ocean. I put the bright colors closer to the front of the painting to create contrast.
4. I applied a lot of texture in the clouds and the rock. I made the clouds look more fluffy, and I made the rock look more jagged. I also used some shadows in the clouds by adding grey.
5. I created depth in many ways. I did this by making the bigger pieces of grass closer to the painting, while the smaller ones are more far back. I also added darks to the back of the ocean to make it seem more far away.
6. I used many different types of painting techniques. For example, I used a pallet knife for the rock, and I used dabbing for the clouds. I also blended a lot of my colors in the water.
7. I had a lot of difficulties with this painting. The rock was really hard to do because I couldn’t get the texture right. It was also challenging to do the clouds.
8. I think I had some success with this painting. I like the colors I used, and I don’t think it’s bad for my first oil painting. I also liked how I did the rock in the end.
Pet portrait Colored sketch
This is my sketch based off of my dog, Jameson. I drew her at a different angle. I used light brown, pink, and black to sketch this. This gives me an idea of the shades I will be using for my final project.
Pet portrait in progress
These are some pictures that show my pet portrait in progress. The first picture, I have the background painted and started on the chest. For the next picture, I have the chest painted and beginning to start the ears. I also started the face. For my last in progress picture, I have a layer of paint on the face and most of the ears.
Pet portRait final
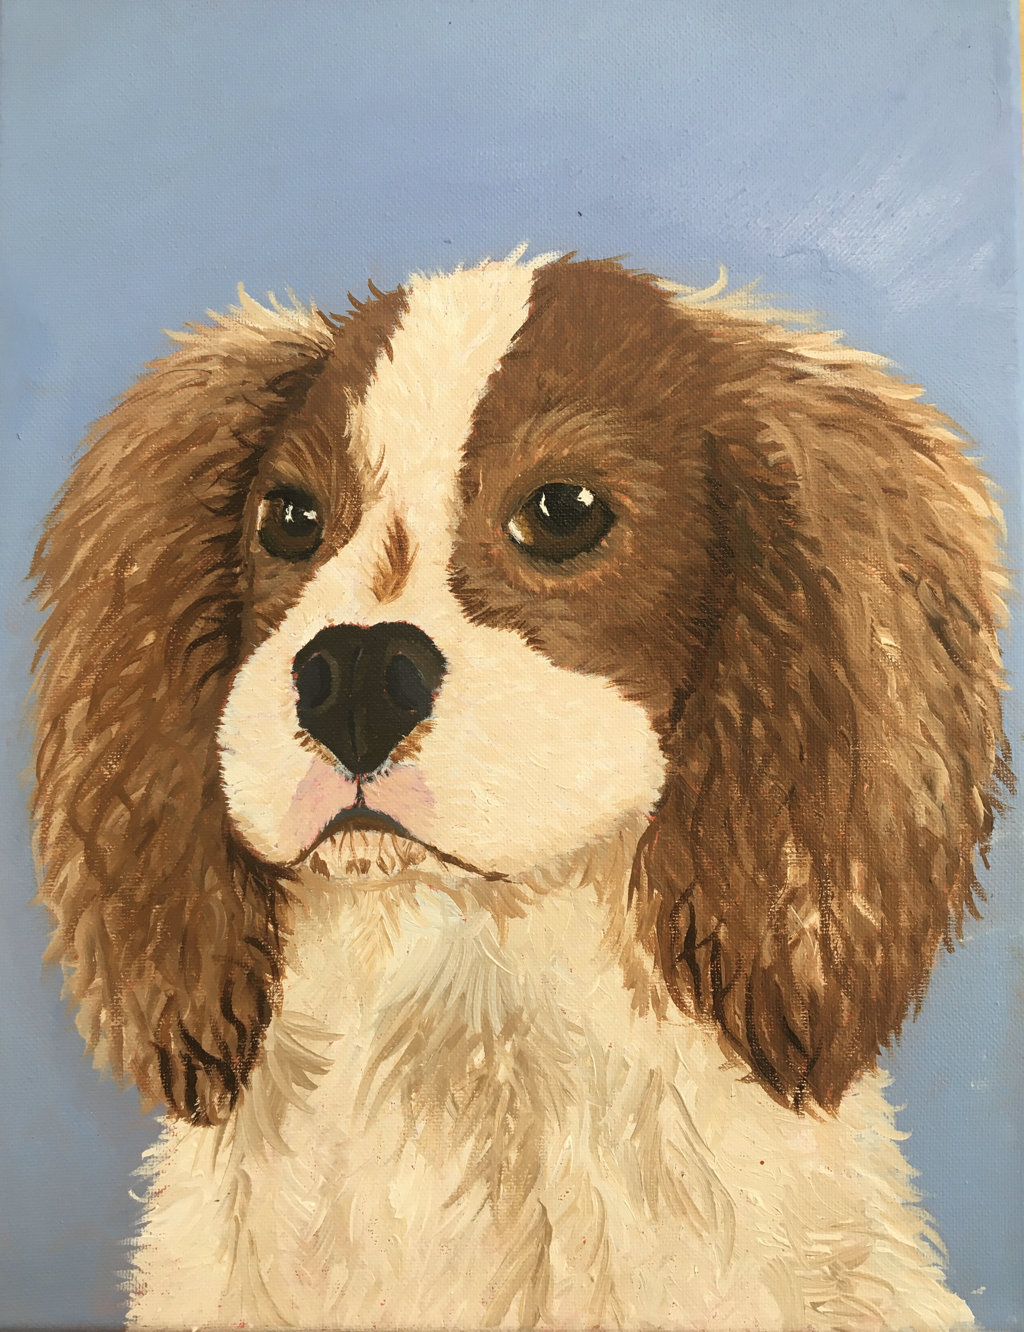
1. This is my pet portrait of my dog. I used multiple colors, and many different shades and tints. For the white fur, I made it a cream color and added darker fur where there was a shadow. For the ears, I used multiple shades of brown and layered it multiple times. For the nose, I used black and used light grey where there are highlights.
2. I accomplished texture by using a very small brush and doing very light strokes. I also blended some of the fur together to make it look more realistic. I also added a lot of shadows which made it seem more realistic. My most important atheistic quality of my painting would be the fur on the chest and ears. There are a lot of layers on them, it’s one of the best features of the painting.
3. The techniques I learned in class helped me with this painting a lot. I learned how to paint fur, and this shows my progress while learning it. I didn’t have much of a creative process when painting this. I try and focus on the picture as much as I can.
4. I learned a lot while I was painting this. I learned yo have to do multiple layers for the fur, and the paint needs to be thin. I also learned for next time I need to work on how I paint eyes.
5. The quality of this painting is alright. It could be a lot better. I think if I changed the background and the eyes, the paining would look better. The fur I did a decent job on considering it was my first animal portrait.
Practice glass painting
This is my practice painting of a glass. I used a lot of whites where there were highlights, and multiple colors for the background. In the future I will use a thinner brush. I will also use less color.
Glass painting progress pictures
These are my progress pictures for my glass painting. I used very bright colors, and added a lot of highlights. I also used oil paint for this project. I tried to take up a lot of the space in the picture to make it look better.
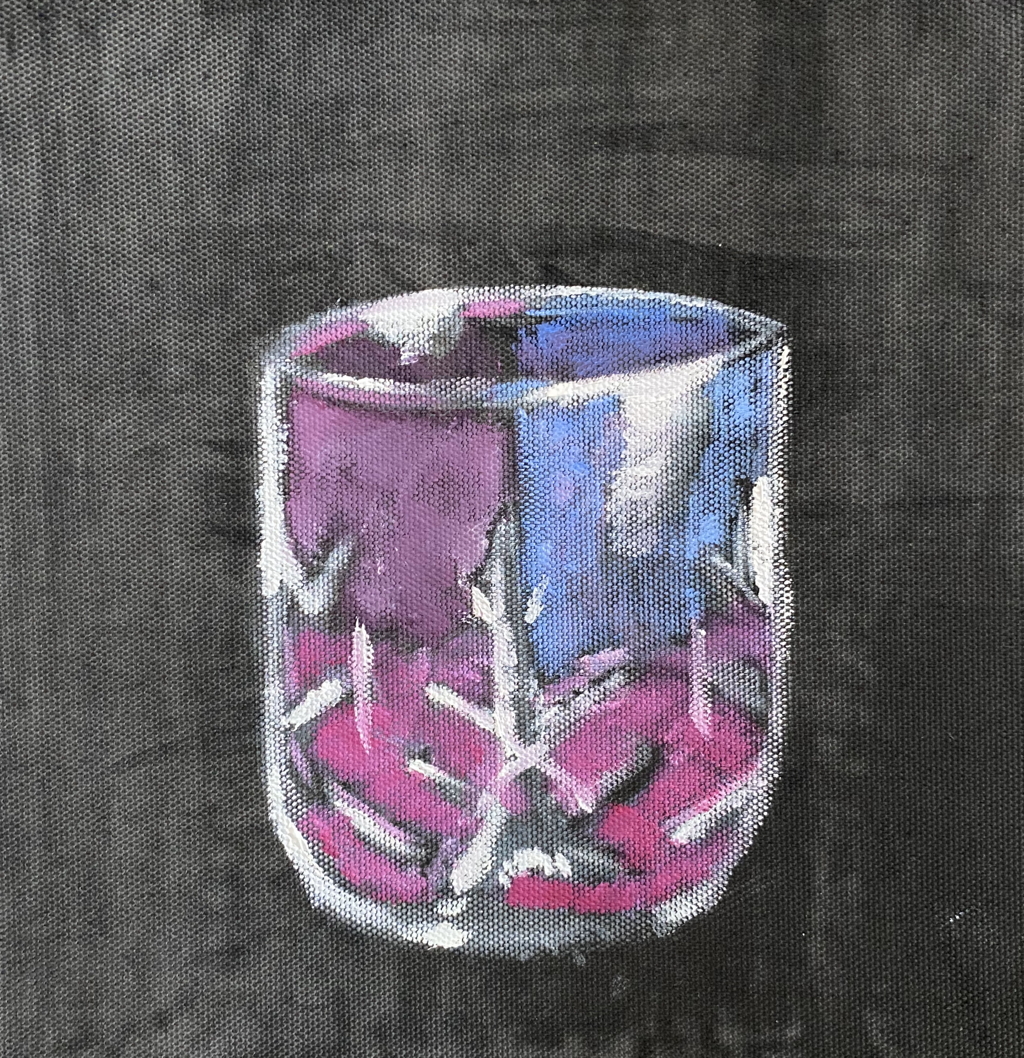
Glass painting final
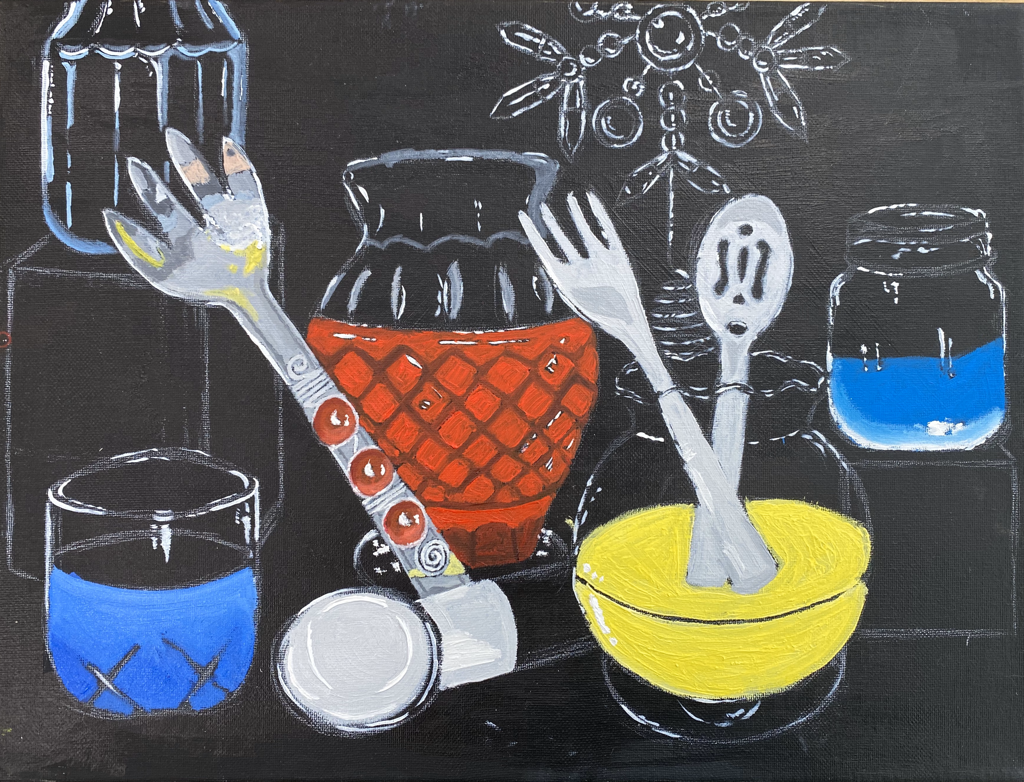
This is my final painting of a glass still life. I used very bright colors in this to make the glass pop out. I also used multiple highlights in this to show the light shinning. Overall I don’t think I did terrible while painting this. It was my first painting of a still life. I think I did a good job showing where the light was hitting. I used a lot of techniques that I learned in class. I learned how perspective matters. I also learned a lot while painting this. I learned that next time I should use less color. I shouldn’t fill in the whole glass. I should do what I did with the bottle for the whole painting. I didn’t enjoy painting this. It was very hard and I think I should try an easier one next time. I used small brushes to make sure I got all the little details.
Final reflection
I learned a lot from this class. I improved a lot since the beginning. Once I got into this class, I didn’t know any painting techniques. Now I know how to use skills such as; blending, using different brush sizes, choosing colors wisely, and more. Water color was the hardest thing for me to paint with. I learned how to use different kinds of paint too, such as oil paint. My favorite thing to paint was the pet portrait, while my least favorite was the glass painting. It was extremely hard to get all of the details right. The pet portrait was my favorite because I love animals and I actually wanted to paint it. This gave me a lot of motivation to try and get it right. The first painting we did was also really hard for me. It was hard painting something realistic with water color. I’m still not confident in my painting but now I know a little bit more. I feel a lot more comfortable with painting than I did at the very beginning of this class.
